Work Categories Freemium
Work categories are your project's classification tree — for example Building › Walls › Internal Walls. You build the tree once per project (up to three levels deep), then file each tagged item under one node in QTOTag. It is how the quantities are organised for the bill of quantities.
Where this fits
You manage the tree from QTOSetup: the
Edit Work Categories… button opens this dialog. The tree drives the three-level
Work category cascade in QTOTag, where
each item is assigned a node (e.g. Building › Doors › Internal Doors). The assignment is
stored on the item as a snapshot, so it survives later edits to the tree.
The dialog
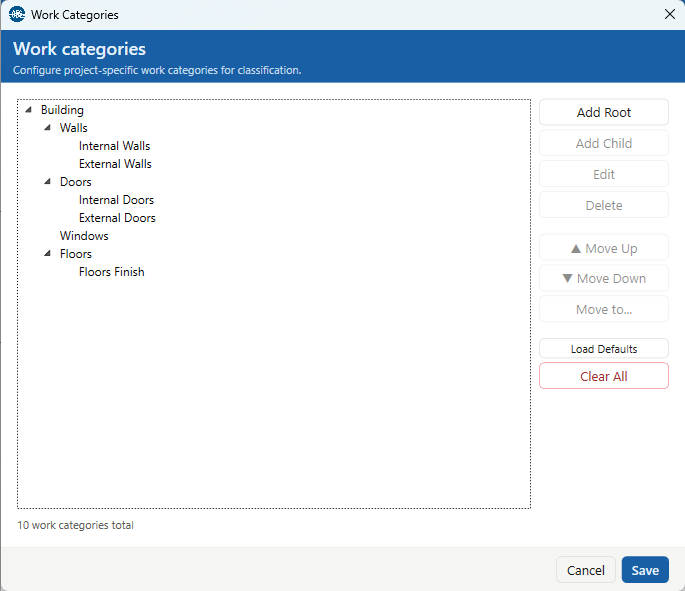
The left side is the category tree (three levels maximum); the buttons on the right act on the selected node:
- Add Root — adds a new top-level category.
- Add Child — adds a category under the selected one. Disabled once the selected node is at the third level (the tree is capped at three levels).
- Edit — renames the selected node. It keeps its internal identity, so items already filed under it stay filed after a rename.
- Delete — removes the selected node and all of its children (after a confirmation).
- ▲ Move Up / ▼ Move Down — reorder the node among its siblings.
- Move to… — re-parent the node elsewhere in the tree. You can also drag and drop nodes directly. A move is refused if it would create a loop (a node into its own descendant) or push the tree past three levels.
- Load Defaults — replaces the tree with a default Italian structure (Strutture, Edilizia, Impianti, Finiture, Opere Complementari); it asks for confirmation if the tree isn't empty.
- Clear All — removes every category (after a confirmation).
The line at the bottom shows the total count and the full path of the selected node. Save writes the tree; Cancel discards your changes, warning first if there are unsaved edits.
Where they're stored
The tree is saved inside the Revit document with the project configuration — there is no external file. Each node carries a stable id, which is why renaming or moving a node keeps every item already filed under it. The tree is capped at three levels. Defining work categories is optional, but they are what makes the Work category picker in QTOTag useful.